Standing Desk Converter with Scrap Wood
If you’re like me, you’ve thought about joining the standing desk trend, but the price of entry is a turn-off. Why spend hundreds of dollars on a new desk when you can surely make your own with a little DIY woodworking? It turns out, you can easily create your own standing desk with nothing more than your current desk, some scrap 2x4s, and some basic woodworking skills.
Who should use this guide?
You have a lot of options for standing desks, so there isn’t a one-size-fits-all solution. There are a lot of fancy, and expensive, desks and converters out there. This project will make something more basic than any of those. It will simply raise your entire desk to standing height.
I see several advantages to this plan. Architecturally, it’s the simplest solution; you won’t have to worry about moving parts or anything complicated. Commercial adapters are typically designed to accommodate your keyboard and monitor, but what if you want to use the rest of your desk space while standing? Finally, and perhaps most importantly, this is your cheapest option.
Whether or not there are disadvantages will depend on your tastes. This desk will not be adjustable. If that concerns you, then you might need to look for another solution.
Before you begin
- Make sure you know exactly how high you want your standing desk to be. It should rise to the height of your elbow when your arm is at your side. Wikipedia’s article on standing desks has a good illustration.
- Measure your current desk. You’ll need to know its height, width, depth, and how thick its legs are.
Here are the measurements I took for my desk:
| Section | Measurement |
|---|---|
| Original height | 30¼" |
| Desired height | 41" |
| Depth (measured across the legs) | 22" |
| Width (measured across the legs) | 47⅝" |
| Leg thickness | 1¾" |
BEWARE!
Understanding your measurements is critical. Throughout this guide, I’ll refer to the dimensions I used, but you will have to modify my plan based on your own measurements. Don’t worry, it shouldn’t be too complicated. As always, measure twice, cut once 😉.
Sound good? Let’s get started!

Download the SketchUp file to follow along
Tools
- Drill
- Pocket-hole jig (like this Kreg Jig)
- Saw
- Square
- Measuring tape
- Orbital sander
Materials
- 3" wood screws
- 2½" pocket screws (see note on step 3)
- Wood glue
- Stain (optional)
- 2x4s (huh?)
Wait, you want your materials to be more specific than just “2x4s?” When it comes to the exact amount, you’re on your own. Remember, this project needs to be custom-built for your current desk. I can’t tell you how much wood you need or how you will cut it.
My cut list (yours will be different)
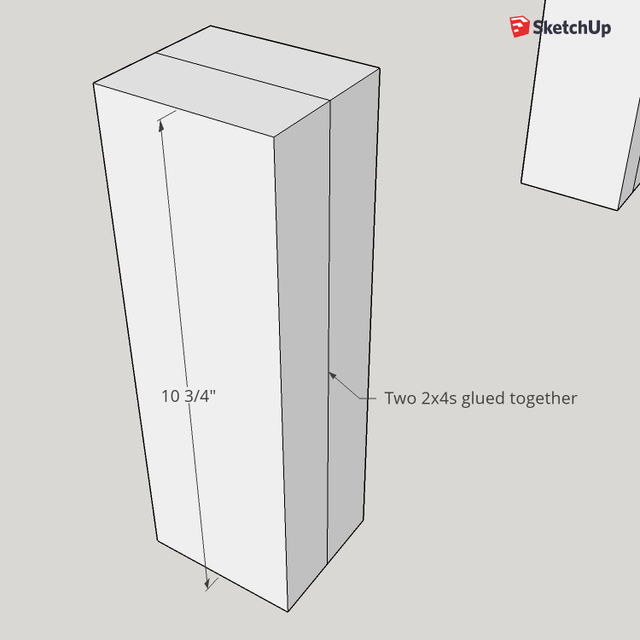
- Feet: 8 - 2x4 @ 10¾"
- This is how high you want to raise your desk: desired standing-desk height minus current desk height.
- Warning! If your desk’s legs are thicker than 2", you may need to use wood wider than 2x4 for the feet and walls, such as a 2x6 instead.
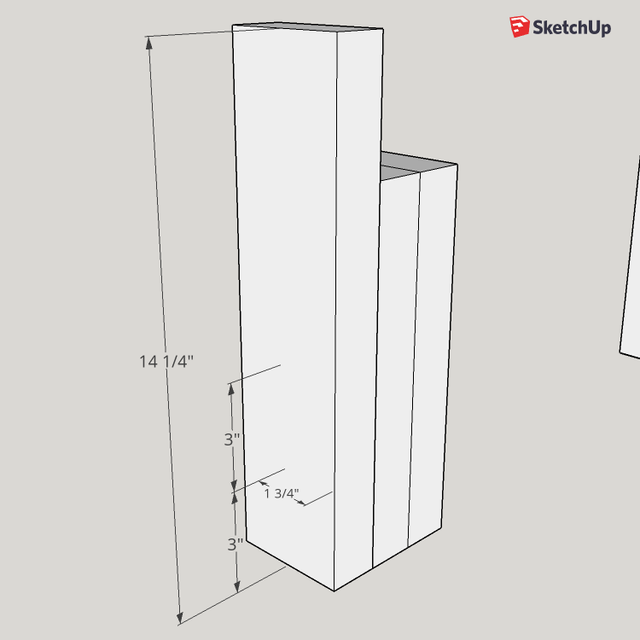
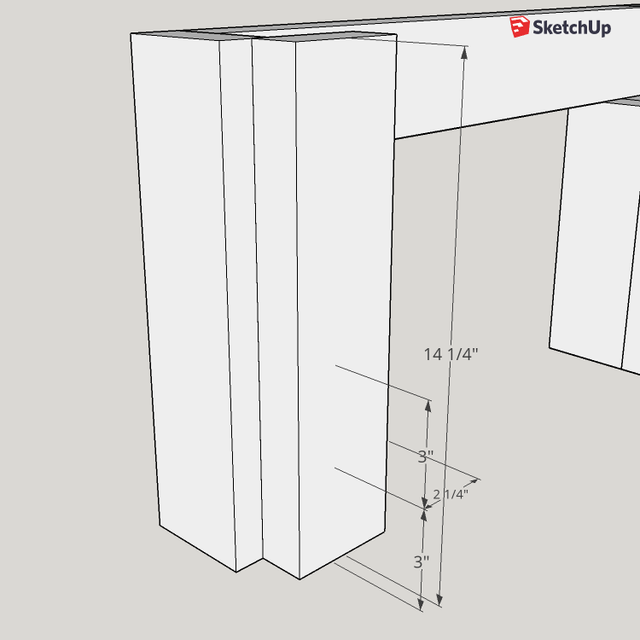
- Walls: 8 - 2x4 @ 14¼"
- This should be 1½" taller than your feet cuts.
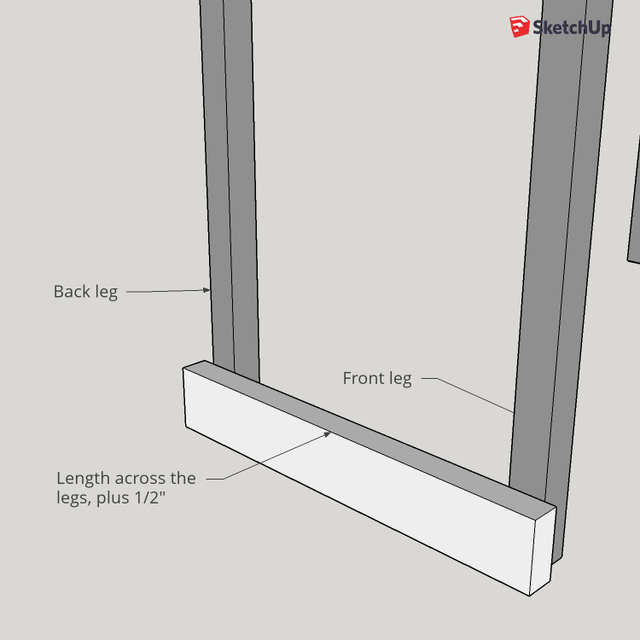
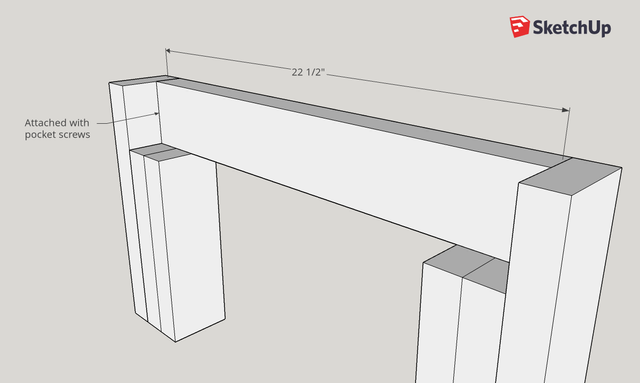
- Side stretchers: 2 - 2x4 @ 22½"
- This is the length between your desk’s front and back legs, plus the thickness of both legs, plus ½".
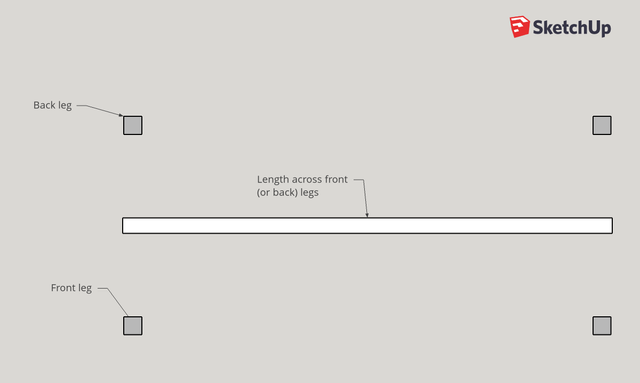
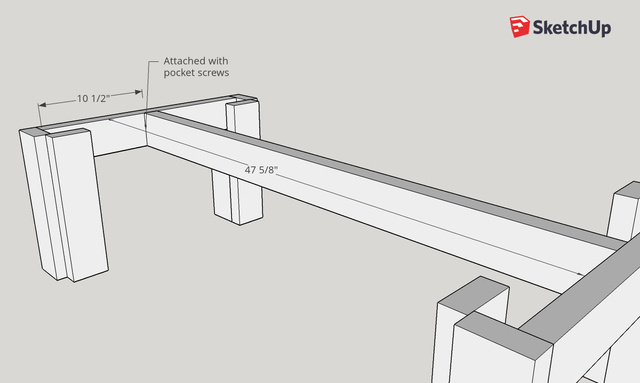
- Middle stretcher: 1 - 2x4 @ 47⅝"
- This is the length between your desk’s two front (or two back) legs, plus the thickness of both legs.
If that seems confusing, here’s a chart:
| Part | First measurement | Operator | Second measurement | Quantity |
|---|---|---|---|---|
| Feet | desired height | - | original height | × 8 |
| Walls | feet height | + | 1½" | × 8 |
| Side stretchers | desk depth | + | ½" | × 2 |
| Middle stretcher | desk length | × 1 |
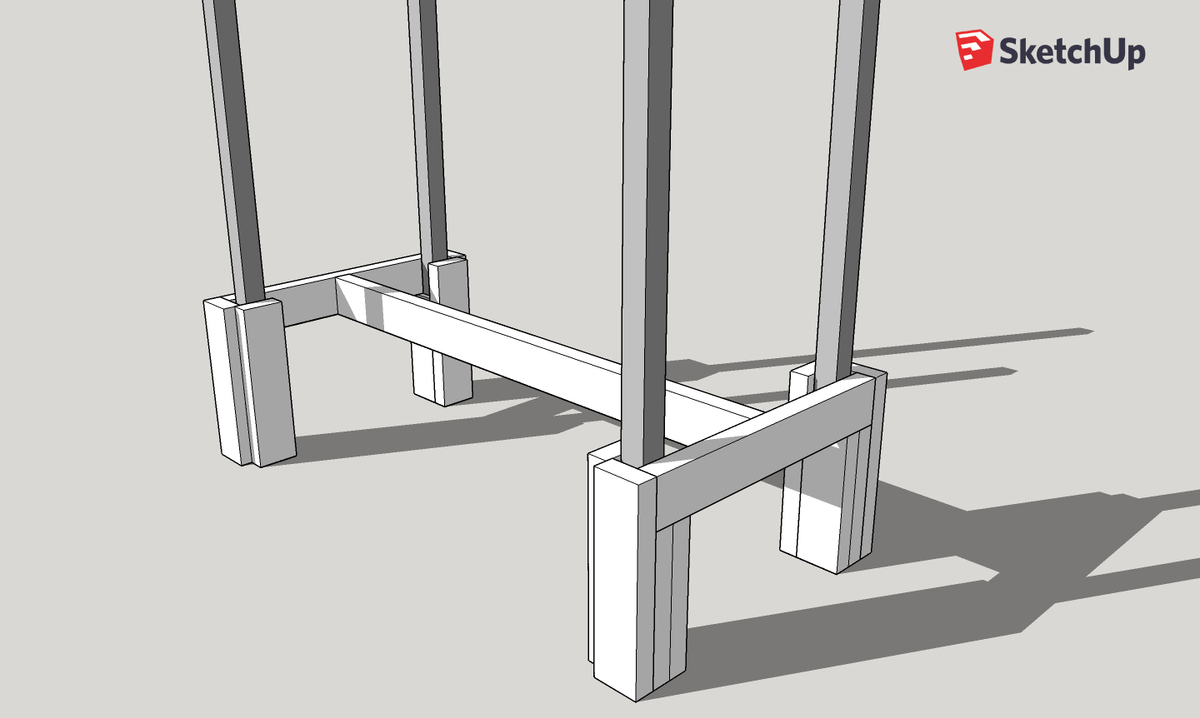
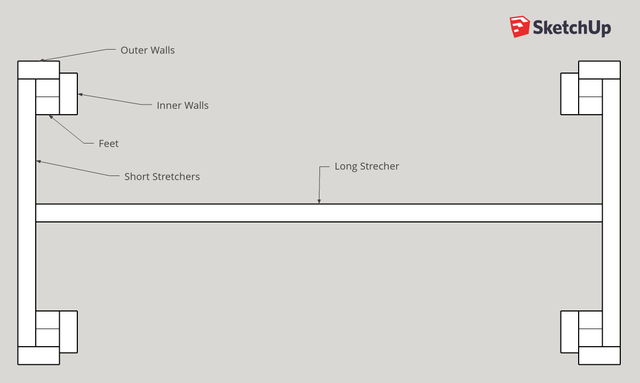
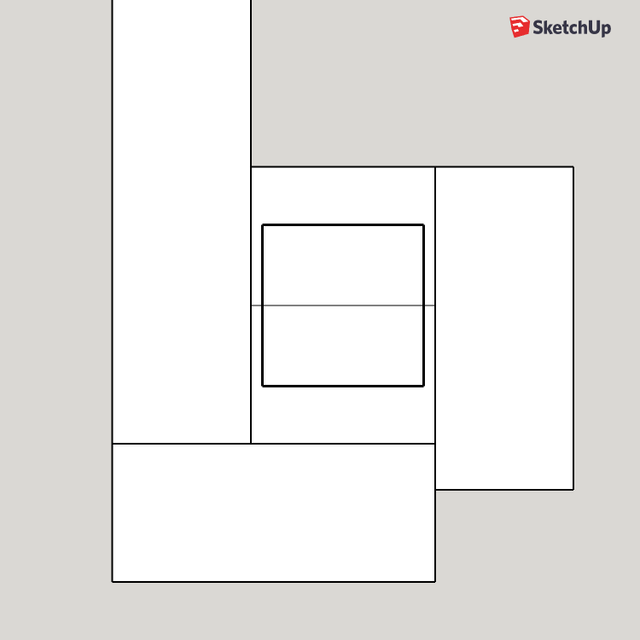
Here are some diagrams to help you visualize it:

I cut mine entirely out of scrap, but here’s a chart to give you an idea of how much wood I used:

Step 1: The Feet
First, cut all of the wood and sand the pieces.
Use wood glue to combine the eight foot pieces into four feet. Apply the glue across one of the broad sides of each 2x4, and clamp until the glue settles. It’s best to wait 24 hours before continuing.
Step 2: The Outer Walls
Take four wall pieces and attach each to a broad sides of each foot. These will either become the front or back of the foot, depending on which side of the desk the foot goes on. I attached it with 2 wood screws into the middle of the wall (1¾" from each side), about 3" apart.
Step 3: The Side Stretchers
Drill 1½" pocket holes into one end of each of your stretchers. Rest the stretchers on top of the feet, flush with the foot’s edge, and use pocket screws to attach the stretchers to the walls.
Notes on step 3:
- Kreg recommends that you use 1½" pocket holes and 2½" pocket screws. I had 2" screws left over from a previous project, so I used those with 1¼" holes instead. It turned out fine, but you should probably use their recommendation!
- After this step, I lifted my desk onto the feet and completed the rest of the project by building around it. I thought that made it easier, but it’s certainly not necessary.
Step 4: The Inner Walls
These are almost exactly the same as the outer walls. Align them flush with the inner side of the foot, which means they won’t quite be flush with the outer wall. When you drill wood screws to attach them, align the screws with the center of the middle 2x4 that makes up the foot, which should be about 2¼" from the outside of the wall.
Note on step 4:
I realized afterwards that this design could possibly have the screws on both walls collide if they’re long enough. To avoid this, you might want to offset the inner wall’s screws vertically by about an inch or so.
Step 5: The Middle Stretcher
Like the side stretchers, drill 1½" pocket holes into the ends of the middle stretcher. Then, attach it to the side stretchers with pocket screws. Before attaching, make sure that it is in the middle of the side stretchers (10½" from each end with my measurements).
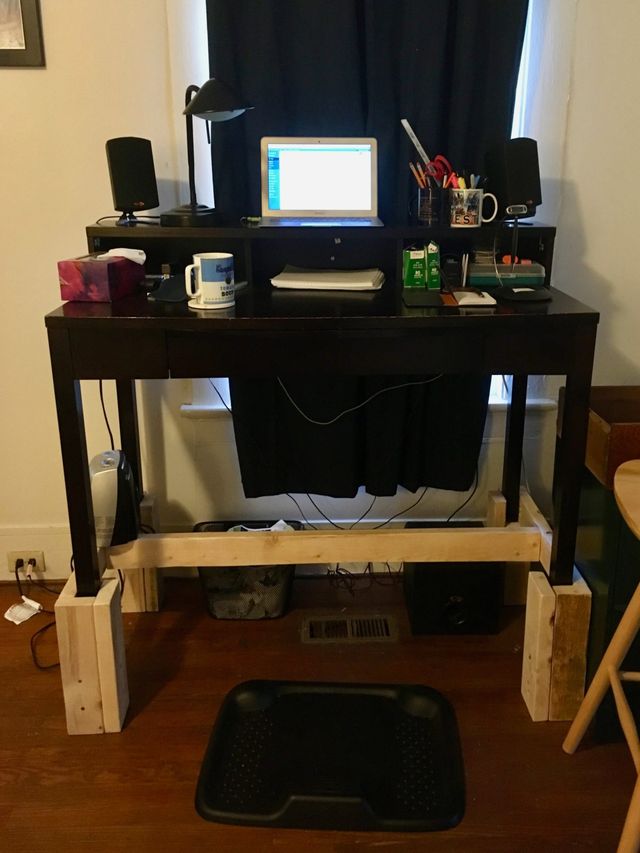
That’s all! Just add your desk, and you’re now a proud standing desk owner. Optionally, you can route the edges, stain the wood, or do whatever else you want to make it match your style.
Final comments about your new standing desk
To me, standing desks offer benefits beyond a healthy lifestyle. I move around when I’m working, so I love the convenience of being able to simply walk up to a desk, do work for a few minutes, and walk away. No sitting down or standing up required.
I’ve found that having a tall chair, or just a barstool, eliminates the need to adjust a desk. Standing is great, but there’s sometimes too much of a good thing.
When I converted my desk, it already had a shelf to put a monitor at eye-level. When you’re standing, you’ll quickly realize the importance of proper monitor height. If you haven’t already, consider getting a shelf for your monitor (or just stack some big books).